How to Create Bootable USB from Windows 7/8/10 ISO Image
Windows is the most popular operating system on the earth and millions of computers are powered by it. The computer may run into various problems such as blue screen, boot failure, or forgetting login password. A quick fix to those issues is to reinstall Windows from scratch. Generally, we can install Windows OS from USB or DVD drive. But for now, USB is preferred as it is easy to get one. Plus, DVD drive is no longer shipped in default on more and more computers.
So the question goes to how to create a bootable USB from Windows 10/8/7 ISO file. As far as I know, there are at least 5 well-known programs for this purpose. They are Windows USB/DVD Download Tool, Rufus, Universal USB Installer, UNetbootin, RMPrepUSB and WiNToBootic. I will take two of them for example because there are the best among them.
Supported Windows ISO File: Windows 10, Windows 8/8.1, Windows 7, Windows Vista and Windows XP.
Method 1: Create Bootable Windows Installation USB from UUkeys ISO Mate
There are many USB burning solutions out there before UUkeys ISO Mate was released. The reason is that most of the available options are hard to use and the success rate is quite low for USB burning. We have put a lot of efforts to make a great ISO to USB burning software so that you can easily create Windows installation disc from Microsoft Windows ISO file. We have tested it on 20+ USB manufacturers and works well on all of them. It has been proven the No.1 choice for burning ISO to USB.
Step 1. Install UUkeys ISO Mate on a Windows computer.
Step 2 . Open the program and click "Import" button to add Windows ISO file to it.
Step 3 . Insert an USB drive to the computer.
Step 4 . UUkeys ISO Mate will detect the drive automatically and click "Start Burn" button to write ISO file to the USB drive. Wait for a few minutes and you will get a bootable USB drive.

Method 2: Use Windows USB/DVD Download Tool to Create Bootable USB from Windows ISO
The main intention behind Windows USB/DVD Download Tool is to offer you an opportunity for loading Windows OS into some bootable or reusable device. It is the official way recommended by Microsoft to create bootable media from USB or DVD. After creating the disk, you can directly boot your computer from USB to do all kinds of emergency tasks, like reinstallation, system diagnosis.
Create Bootable USB Drive with Windows USB/DVD Download Tool
Step 1: Download and Install Windows USB/DVD Download Tool
Download the tool from official site. Windows will take permission from you to ensure the continuation of the process. Hit Run button and it allows the tool to move towards the installation process. Within a few seconds, the program will be installed on the computer.
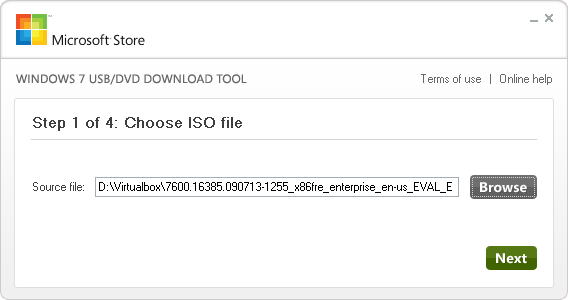
Step 2: Choose an ISO Source File and Plug USB Drive to Computer
Select ISO file, which is an image of the Windows OS. While there is no copy of such file, you have to download it first. Choose Browse option to locate the file and click Next.
Now, you need pick a specific type of media. There are two options available in the program: USB device and DVD. Please click on USB device and select the drive name of inserted USB drive.
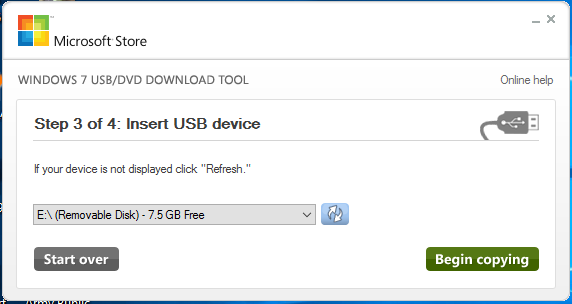
Step 3: Start Creating bootable USB from Windows ISO File
Click "Start over" button and you will see pop-up window, saying the drive will be erased. Click "Erase USB Device" to start the burning process. You can also cancel the process if needed. After that, you can use the drive to reset forgotten login password system reinstall or repair Windows 10/8/7.
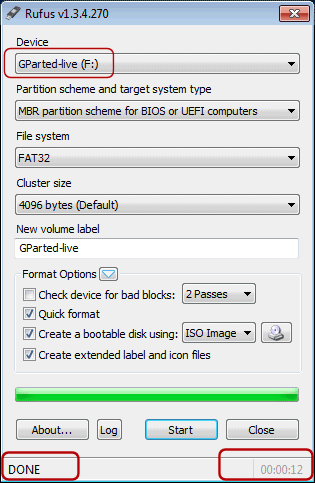
Method 3: Use Rufus to Create Bootable USB from Windows 10/8/7 ISO
Rufus is another free and useful tool to create bootable USB drive. The biggest advantage over other similar program is the running speed. Rufus is much faster than its competitors. For your Windows 10, you need a USB of more than 4GB. Rufus needs an account to do the essential alterations to your hardware. Read the steps for using the software.
Make Bootable USB Drive from Windows ISO with Rufus
Step 1 : Download and Install Rufus
You do not need any installer for downloading Rufus. Download the latest version directly from its website and store the file on a computer. Once it was downloaded, you can run the program immediately without installation.
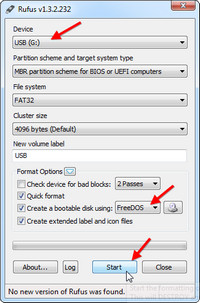
Step 2 : Insert USB into Computer and Make Proper Settings in Rufus
To create bootable USB, the data on USB will be formatted. Thus, ensure that you have backed up all the important documents on that drive. If some of your files are left in USB, the software may not be able to create the bootable drive.
There are a couple of settings you should be notified from the main interface. From the device tab, please select the drive name of USB and select a proper partition scheme from the drop-down list. If you have no clue about the settings, just go with the default settings on the interface.
Step 3: Create Bootable USB From Windows ISO
The final step is to choose a proper media for image burning. Under the Format Options, please click DVD icon to add downloaded Windows ISO file to Rufus. Press Start button to start the USB burning process.
At this point, you can see the message Data will get destroyed. This is your final chance for checking whether proper USB has been chosen and all the files have been backed up. Click "OK" and begin the process. Anything on the drive is going to be removed. There is a progress bar indicating how the task proceeds.
It may take almost five minutes to burn USB drive from the ISO image, though this time varies according to your hardware. When you find the status "Ready", you can exit the software at that time.
Thus, both the software programs, Windows 7 USB/DVD Tool and Rufus, are effective in making bootable USB drives, including DVD and USB. With the creation of these bootable devices, you may easily install Windows OS or recover login password, which seems to be impossible in any other way. Download the tools and find the easiest way of creating bootable disks and drives.
Cathryn Akerman is a professional freelance technology author and worked 8 years as a computer system engineer. Cathryn keeps sharing this computer skills current through UUkeys to her readers and clients.