How to Easily Burn ISO to USB Drive on Windows 10/8/7

Hot Article
Windows Tips

USB Flash Drive is one of the most popular storage devices to boot a new Windows operating system on a computer due to its extreme portability. Installing operating system via USB drive is very fast and reliable. Moreover, you have the choice to revert it back to normal storage device after the install. If you are a 19th century kid then you must remember how many discs you have ruined by just screwing up the write process and the discs used to get scratches real quick.

ISO image file is a compressed file of a compact or optical disk and have a file extension named ".iso". Unfortunately, burning an ISO to USB is not like copying and pasting files from your computer to USB flash drive. It's not even same as burning an optical disc but luckily, there are two free tools that helps you to burn an ISO image file to USB with just a few clicks. The tools we will be using to burn ISO to USB in this article are UUkeys ISO Mate and RMPrepUSB. Both of them are free to use and will get the job done with a blink of an eye.


Method 1: How to Burn ISO to USB with UUkeys ISO Mate (Easy)

UUkeys ISO Mate is a lightweight and powerful tool to burn ISO images to USB flash drive in a few of clicks. All the operations are done on a single user interface. You can make a bootable USB drive with this tool according to different situations. You can make bootable Windows installation disc from Windows XP/7/8/10/ ISO file and it is much easier than using other free tools.


How to Use ISO Mate for USB Burning

  • Step 1: Download UUkeys ISO Mate software from the official website and run it in your computer.
  • Step 2: Insert an USB flash drive and let the software detect the device.
  • Step 3: Choose the ISO file you want to burn in your USB drive by clicking 'Import' button from the software interface.
  • Step 4: Leave other options in default as it is and click on "Start Burn" button.
  • Step 5: That's it. The process may take some time and it is recommended to keep the USB drive plugged in unless it is successfully done.


Method 2: How to Burn ISO To USB Drive with RMPrepUSB Burning Tool (Complicated)

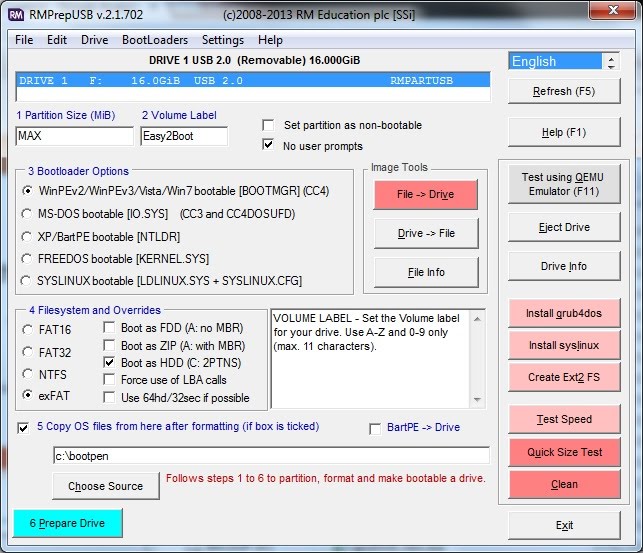
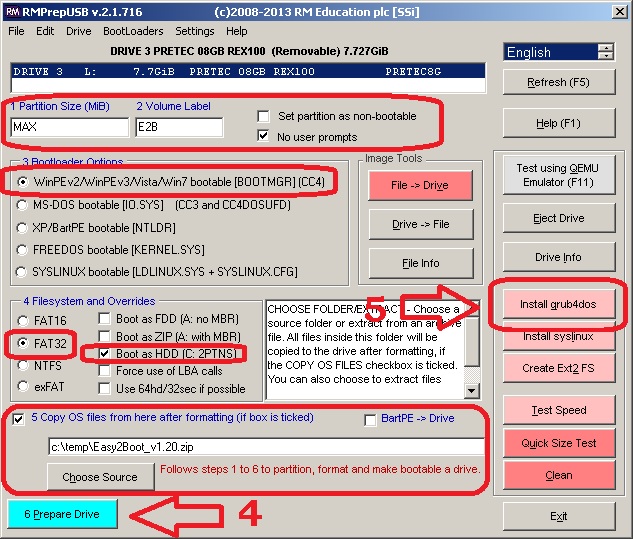
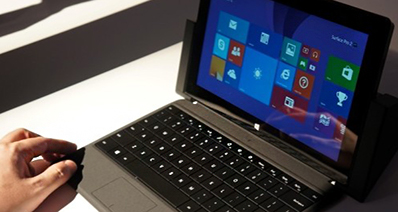
RMPrepUSB is an ultra fast and multi-function USB burning tool developed by an small team. It is completely free software and has many features that other USB burning tool failed to offer, such as UEFI and GPT support. Those are crucial functions for Windows 10 based computers as UEFI is the default BIOS to load Windows OS. It is one of the most effective mechanisms to replace the legacy boot.


Warning: Windows 10 ISO file is not supported. Only works for Windows 7/Vista/XP ISO image.


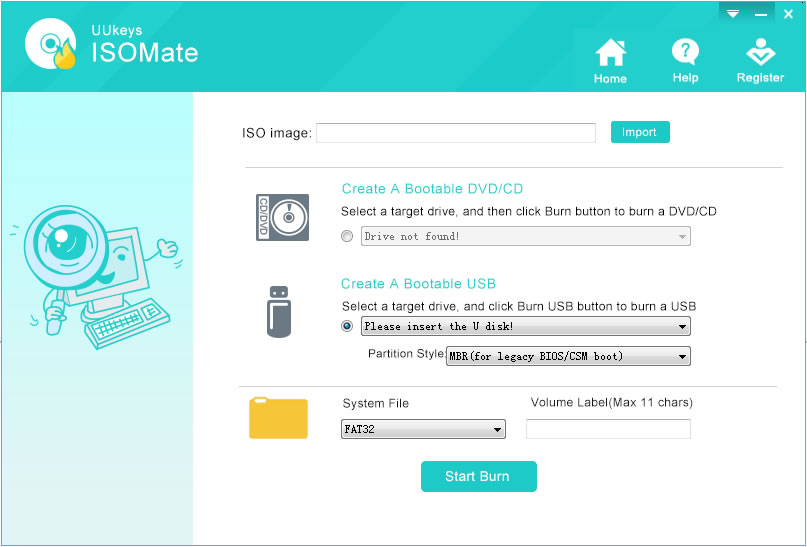
Note: If the main purpose of burning ISO image to USB is to make a password reset disk, then UUkeys Windows Password Mate is a much better solution out there as it has built-in burning tool as well as the password reset utility. Once you created a bootable USB disk with UUkeys, then you can bypass Windows 10/8/7screen password in less than 2 minutes.


How to Use RMPrepUSB to Burn ISO to USB Drive

Step 1 : Download and Open RMPrepUSB

Please note that RMPrepUSB is absolutely free to use and it is recommended to download the software from the official RMPrepUSB website instead of any other third party website.

There is no need to install the software, the tool will open right away with double-click on your mouse. This is one of the top reason to use this software as it will launch right away without any installation like any other software.

Step 2 : Insert USB Drive to Computer

Insert the flash drive on your PC and let the software detect the flash drive. It is recommended to use an 8 GB flash drive if you are trying to burn any operating system ISO file.

Choose the USB storage device you wish to burn the ISO file into from the first "Device" drop down option on the main interface of the program. The software automatically detects and show the flash drive options which you inserted on your PC. It will also show the USB type and the drive path name.

Step 3: Make Proper Settings and Start Burning iOS to USB

Under "3 Bootloader Options", please check "Win PEv2/WinP v3/Vista/Win7" from the list. This will make a bootable USB disk with Windows XP, Vista and Windows 7. Next select "FAT32" and "Boot HDD".

After setting up the configuration, it is time to click "Prepare Drive" button at bottom. Then the burning process will start. Once it is done, you can take out your flash drive and the content of the ISO image file will be transferred to your USB drive.

Note: Do not modify partition size and Volume Label or other options unless you are aware of what you are doing. If you are comfortable using a NTFS file over FAT32 then you may change that option but it is recommended to leave the options alone.

While burning an ISO image file to USB can be a pretty tough job but it is easy if you are using the above mentioned tools. The software are malware free and are very small tools which will merely take any space on your computer. Hopefully you were able to burn your ISO files to USB using the mentioned software above.


Related Articles & Tips